The QC Inspection That Saved Us $12,000: What Corporate Gift Buyers Actually Need to Check
Practical quality control inspection protocols for corporate gift orders, including defect classification systems, AQL sampling methods, and on-site verification techniques that prevent costly acceptance of substandard shipments.

The email from our events team arrived at 4 PM on a Friday: "The gift boxes look amazing in photos, but we're seeing quality issues. Can you come look?" I drove to the warehouse expecting minor cosmetic concerns. What I found was 800 leather portfolio sets with embossing so faint it was barely visible under normal lighting—a $12,000 order that couldn't be used for our client event in nine days.
The supplier had sent pre-production samples that looked perfect. They'd provided photos of the production run that appeared acceptable. But nobody had conducted a proper on-site inspection before the shipment left their facility. By the time we discovered the issues, the goods were already in Singapore, the supplier was claiming they met "industry standards," and our timeline left no room for reproduction.
This disaster taught me that corporate gift quality control requires specific protocols that differ fundamentally from consumer product QC. The stakes are different—you're not just protecting product functionality but safeguarding brand reputation at high-visibility events. The inspection criteria must reflect this reality.
Understanding Defect Classification for Corporate Gifts
Quality control starts with defining what constitutes a defect and how serious different defects are. The apparel industry uses a three-tier system—critical, major, and minor defects—that adapts well to corporate gifting with some modifications.
Critical defects make items completely unusable for their intended purpose. For corporate gifts, this includes incorrect logos (wrong company name or misspelled text), missing components (a pen set missing the pen), or structural failures (box lids that won't close). These defects have zero tolerance—even one critical defect in a shipment justifies rejection.
Major defects don't prevent use but significantly impact perceived quality. Faint embossing that's barely legible, misaligned printing, visible glue stains on premium materials, or color variations that don't match approved samples fall into this category. The acceptable rate for major defects typically ranges from 1.5% to 2.5% depending on the item's price point and intended recipients.
Minor defects are cosmetic issues that don't affect functionality or significantly impact appearance. Slight variations in leather grain texture, barely visible scratches on interior surfaces, or minor thread irregularities in fabric lining represent minor defects. Acceptable rates for minor defects usually range from 4% to 6.5%.
The challenge lies in the gray areas. Is a logo that's 15% lighter than the approved sample a major defect or a minor one? Is a box corner with slight crushing from packaging a major defect or acceptable handling wear? These judgment calls require pre-agreed reference samples and clear communication with suppliers about expectations.
AQL Sampling: Balancing Thoroughness and Practicality
Inspecting every unit in a 500-piece order isn't practical or cost-effective. The Acceptable Quality Limit (AQL) sampling method provides a statistical framework for determining how many units to inspect and how many defects trigger shipment rejection.
For corporate gifts, I typically use AQL 1.5 for major defects and AQL 4.0 for minor defects. These levels reflect higher quality expectations than mass-market consumer goods (which often use AQL 2.5/4.0) but remain achievable for competent manufacturers.
The sample size depends on the total order quantity. For orders of 280-500 units, AQL tables indicate inspecting 80 units. For 501-1,200 units, inspect 125 units. These samples must be randomly selected from different production batches and packaging cartons—not just the top layer of neatly arranged units the supplier presents.
The acceptance/rejection criteria follow the AQL table. For an 80-unit sample with AQL 1.5 for major defects, finding 3 or fewer major defects means acceptance; 4 or more means rejection. For AQL 4.0 minor defects, 7 or fewer minor defects means acceptance; 8 or more means rejection.
I learned the importance of random sampling the hard way. A supplier once arranged the first 100 units of a 600-unit order with exceptional care, knowing these would likely be inspected. The remaining 500 units showed significantly lower quality. Now I insist on selecting samples myself, pulling units from the middle and bottom of cartons, from different production batches, and from various positions in the packing sequence.
On-Site Inspection Protocols: What to Actually Check
Effective quality control requires systematic inspection protocols that cover all aspects of the product. I use a checklist approach that examines items in a specific sequence, preventing the tendency to focus on obvious issues while missing subtle problems.
Start with packaging integrity. Check outer cartons for damage, moisture exposure, or crushing that might affect contents. Open cartons carefully and note how items are packed—adequate protective materials, proper orientation, and secure positioning all matter for items that will be repacked and transported to event venues.
Examine dimensional accuracy next. Corporate gift boxes must fit their intended contents properly. I've encountered boxes that looked perfect empty but couldn't accommodate the items they were designed to hold because interior dimensions were 3mm too small. Bring samples of the actual items that will go in the boxes and verify fit during inspection.
Logo and branding elements require the most careful scrutiny. Compare embossing, printing, or engraving against approved samples under multiple lighting conditions—overhead fluorescent, natural daylight, and angled desk lamps all reveal different aspects of quality. Check for consistency across multiple units, not just whether individual pieces look acceptable.
Material quality assessment involves both visual inspection and tactile evaluation. Leather should show consistent grain patterns and color across units. Fabric linings should lie smooth without bubbles or wrinkles. Foam inserts should feel uniformly dense without soft spots. Run your hand across surfaces to detect irregularities that visual inspection might miss.
Functional testing matters more than many buyers realize. Open and close box lids repeatedly—do hinges or magnetic closures work smoothly? Do foam inserts hold items securely or allow rattling? Can recipients easily remove items from cavities without excessive force? These functional aspects affect user experience as much as visual quality.
Common Defects and Their Root Causes
Certain defects appear repeatedly in corporate gift production, usually traceable to specific process failures. Recognizing these patterns helps identify whether issues stem from isolated mistakes or systematic quality control breakdowns.
Inconsistent embossing depth across a production run typically indicates temperature control problems or die wear. The first 50 units might show perfect impressions while units 200-300 show progressively fainter marks as the die temperature drifts or the die surface degrades. This pattern suggests the supplier isn't monitoring process parameters during production.
Color variations between units point to either material sourcing inconsistencies or production batch mixing. Leather and fabric naturally show some variation, but units from the same order shouldn't display obvious color differences when placed side by side. Significant variation indicates the supplier used materials from different dye lots without proper matching.
Adhesive bleed-through on fabric or paper surfaces reveals improper adhesive application—either excessive quantity or incorrect adhesive chemistry for the materials being bonded. This defect often doesn't appear immediately but develops over 24-48 hours as adhesives fully cure. Inspections conducted immediately after production might miss issues that become obvious days later.
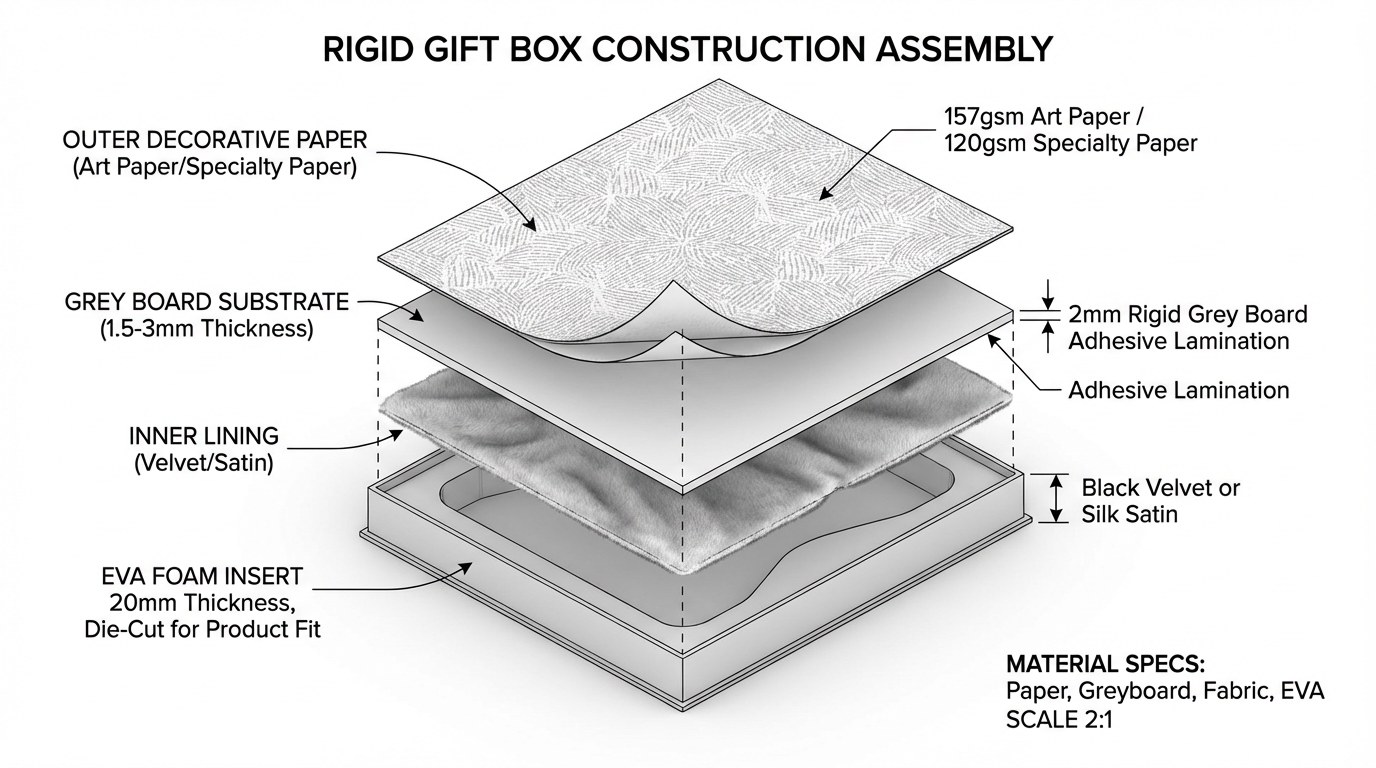
Structural deformation in rigid boxes—corners that don't meet squarely, lids that sit askew, or bases that rock on flat surfaces—indicates problems with grey board cutting accuracy or assembly technique. These defects suggest inadequate tooling or insufficient operator training rather than material quality issues.
Documentation: Building the Case for Rejection or Acceptance
Quality control inspections generate value only when properly documented. I photograph every defect type found, capturing both close-up detail shots and wider views showing the defect's location on the item. These photos become critical evidence if disputes arise about whether shipments meet agreed specifications.
The inspection report should quantify findings precisely: "Found 6 major defects in 80-unit sample (7.5% defect rate, exceeds AQL 1.5 acceptance threshold of 3.75%)" rather than vague statements like "quality issues noted." Specific numbers prevent suppliers from dismissing concerns as subjective opinions.
For defects that fall into gray areas, I document them separately from clear-cut major/minor defects. "Borderline issues requiring client review: 12 units show logo color 10-15% lighter than approved sample" gives stakeholders information to make informed decisions about acceptance without artificially inflating defect counts.
Include environmental conditions in inspection reports—temperature, humidity, and lighting conditions all affect how materials appear and perform. A leather portfolio that looks acceptable in an air-conditioned warehouse might show different characteristics in a humid outdoor event venue. Documenting inspection conditions provides context for later discussions.
Negotiating Remediation: Practical Options Beyond Rejection
Discovering quality issues doesn't automatically mean rejecting entire shipments. Depending on the defect severity, timeline constraints, and supplier cooperation, partial acceptance with remediation often provides better outcomes than outright rejection.
Sorting and segregation works when defect rates exceed AQL limits but many units remain acceptable. Propose that the supplier (at their cost) sort through the entire shipment, removing defective units and replacing them with acceptable ones. This requires the supplier to have additional inventory or rapid reproduction capability.
Discount negotiation makes sense for minor defects that don't critically impact usability. If 8% of units show minor cosmetic issues that recipients likely won't notice, negotiating a 15-20% price reduction for affected units might be more practical than demanding reproduction with its associated delays.
Rework options exist for certain defect types. Faint embossing sometimes can be re-pressed with adjusted temperature and pressure. Misaligned labels can be removed and reapplied. Assess whether rework is technically feasible and whether the supplier has the capability and willingness to perform it.
In the case of our faint embossing disaster, we negotiated a hybrid solution: the supplier re-embossed 400 units that showed the faintest impressions (this was technically possible because the original embossing hadn't damaged the leather), provided a 30% discount on the remaining 400 units with borderline-acceptable embossing, and expedited shipping to meet our event timeline. This cost us $3,600 instead of the full $12,000 loss we'd have faced using defective goods or missing our event deadline.
Preventing Issues: Pre-Production Approval Protocols
The most effective quality control happens before production starts, not after shipments arrive. I now require pre-production samples that undergo the same inspection protocols as final shipments. These samples must come from the actual production setup—the same dies, materials, and equipment that will produce the full order.
Golden sample approval involves the buyer providing or approving a physical sample that becomes the quality standard for the entire production run. This sample stays with the supplier during production, and workers compare their output against it. Photographic approvals don't provide the same tactile reference that physical samples offer.
In-process inspections during production runs catch issues before entire orders are affected. For orders exceeding 300 units, I arrange for inspection after the first 50-100 units are produced. This early check reveals process control issues while there's still time to make adjustments.
Material pre-approval prevents surprises from material substitutions. Suppliers sometimes source materials from different vendors than those used for samples if their primary supplier runs short. Requiring notification and approval before any material substitution prevents situations where finished goods don't match approved samples due to material changes.
Building Supplier Quality Partnerships
The relationship between buyers and suppliers shouldn't be adversarial, with inspections serving as "gotcha" moments. The best supplier relationships involve collaborative quality management where both parties work toward the same standards.
I share inspection checklists and defect criteria with suppliers before orders begin. This transparency helps them understand expectations and implement appropriate quality controls during production. Suppliers appreciate knowing exactly how their work will be evaluated rather than facing surprise rejections based on unstated criteria.
Providing feedback on both successful and problematic orders helps suppliers improve. When an order exceeds expectations, I document what went right—specific processes, materials, or techniques that produced superior results. When issues occur, I provide detailed analysis of root causes rather than just listing defects.
Paying for quality rather than always choosing the lowest bidder signals that quality matters. Suppliers who consistently deliver acceptable quality at slightly higher prices deserve preference over those who offer low prices but generate frequent quality issues and the associated remediation costs.
The $12,000 lesson from our embossing disaster transformed how I approach corporate gift quality control. Systematic inspection protocols, clear defect criteria, proper documentation, and collaborative supplier relationships now prevent most quality issues before they impact events. When problems do occur, established processes enable faster resolution with better outcomes for all parties. Quality control isn't about catching suppliers making mistakes—it's about ensuring that corporate gifts successfully represent the brands they're meant to promote.
Related Articles

What Is the Minimum Order Quantity for Corporate Gifts in Singapore?
What Is the Minimum Order Quantity for Corporate Gifts in Singapore?

Why Your First Corporate Gift Order Costs More Than the Quote Suggested
Why Your First Corporate Gift Order Costs More Than the Quote Suggested

When Negotiating Lower MOQ Actually Extends Your Delivery Date by Six Weeks
When Negotiating Lower MOQ Actually Extends Your Delivery Date by Six Weeks